Topics
Projects
Quick Formatting with Writer Styles
The secrete to working with computer programs is to let the program do most of your work. This is particularly true when formatting documents. Just about every computer program has a built in default set of instructions. When you create a new Writer document, the program uses the default formatting of Times New Roman font in a 12 pt size. This can be considered the global formatting for the document. Therefore, formatting falls into two basic categories: manual formatting and global formatting. If you highlighted a word in the document and changed it to bold, that would be considered manual formatting because the formatting is applied only to the selected text . If you want to change the font for the whole document efficiently then you modify the global style which effects all the text. Global formatting it can be done one of two ways:
- The inefficient way: manually select all the text in the document and change the font, which the common way for users who are unaware of style formatting.
- The efficient way: change the global font by changing the default paragraph style font to the desired font.
Manual formatting is best left for small bits of formatting like highlight or accentuating certain words, lines of text or the odd paragraph that you want to stand out. The simplest and most efficient way is to change the global formatting for the whole document is to change the default formatting style for that document. Most programs that handle text will have a default formatting style sheet that can be modified. Once the default formatting is changed the whole document automatically takes on the new formatting and continues to use the new formatting. Writer uses different default styles to control different parts of the document; such as the Default Paragraph Style that controls the formatting for all paragraphs, the Default Headings Styles that control the formatting for all the different headings levels and a Default Page Style that controls page formatting like margins, page size/orientation, headers and footers. If wish to change the look of a document but would like to keep it simple then just modify the Default Paragraph and Heading styles. Modifying the default styles applies the changes instantly to the document so there's lots of room for experimentation.
Modifying the Default Paragraph Style
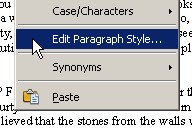
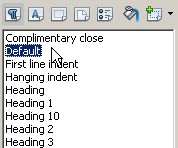 The body of a Writer document is controlled by the default paragraph style named "Default". The easiest way to access this Default Paragraph style menu is to right-click on any paragraph to open the Context Menu and from the Context Menu choose the Edit Paragraph Style option. All Writer styles can also be accessed through the Styles and Formatting Panel. Since this panel contains all Writer styles, including Page Styles and Graphic Styles, it is best used after more experience is gained in the understanding how styles affect a document. After some experience with style, the Styles and Formatting panel will be a more efficient way in which to apply, customize and edit styles.
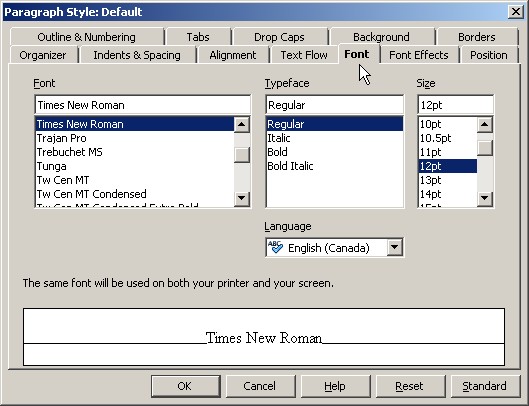 The Default Paragraph Style box contains many tabs for all the different formatting options. The only two tabs that are needed for basic formatting are the Font tab and the Indent & Spacing tab. The Indent & Spacing tab is useful for controlling line and paragraph spacing. A document can be made easier to read by increasing its line and paragraph spacing from the default spacing. However, if you wish to keep the formatting as simple as possible, ignore the line spacing and focus on choosing the right font and the right font size.
About Fonts
A 12pt Times New Roman font and a 12pt Verdana font will have different letter spacing even though they are both 12pt. Each Verdana letter is much wider and its X-height (the top of the lowercase letters like "a,s, r", are slightly taller letters than the Times New Roman font's x-height, which means that the Verdana font actually takes up more horizontal spacing and looks visually taller than the Time New Roman font. What that means is that if you decide to change a 10 page document that uses a 12pt Times New Roman font to a 12pt Verdana font, the result will yield an extra page, since the Verdana font is a wider font it requires more space. The text would also appear larger because of the Verdana's larger letter x-height. If the verdana font were reduced to 10pt it would have same visual height as the Time New Roman 12pt font and take about the same horizontal spacing.
Although its a simple matter to make a global change to a document's formatting via the Paragraph Style Default box, it may require some fine tuning, as in the case of a font change, to make sure the document hasn't changed to dramatically. If changes to the default style are done after the document is created, a page by page review may be necessary to ensure objects haven't shifted around, particularly if the document contains images. Pictures, with text wrapping applied, tend to get pushed around when global font/font size changes are made after the fact.
Line Spacing and Paragraph Spacing
Line spacing is the spacing between the lines of text. Paragraph spacing is generally referred to as the built in space above and/or below a paragraph. The Indent & Spacing tab controls all the spacing plus line indents.
Line Spacing
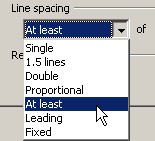 How line spacing is measured is different from program to program. Often it is measured from the baseline (the invisible line that the letters sit on) of one line to the baseline of the next line. In Writer, the default line spacing of "Single" is formatted as 120% of the font size. A 10pt font would then have a line spacing of 12pts. The extra 20% in line spacing is necessary to prevent the descending letter like "y, g, q" from touching the ascending letters like, "h, t, l" of the next line. Increasing the line spacing a point or two larger often makes the paragraph easier to read. Writer provides several options for controlling line spacing. They all have their benefits and problems. The four most useful line spacing options are Proportional, At Least, Leading and Fixed.
Proportional line spacing default is set to a 100%. However, in this case a 100% Proportional spacing really means the default line spacing of Single (120%). Increasing the line spacing over a 100% will increase the line spacing between the lines. If you increase the Proportional line spacing to 110%, it will always be set at a 110%. Increasing/decreasing the font size will keep the line spacing set at 110%.
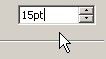 At Least sets the minimum line spacing required. Writer measures this line spacing in inches, however it is more convenient to measure line spacing in points as text is generally measured in points. To convert the line spacing to points merely type a number in the measurement box and add the letters "pt" to represent points. Writer will convert the points to its default of inches. If you set the At Least line spacing to 15pts that means the line spacing will never be less than 15pts. If the font is reduced the line spacing will stay at 15pts. If the font size is increased the line spacing will adjust for the increase in font size.
Leading, as Writer refers to it, is the actual vertical space between the lines. You can think of it as that default 20% that prevent the descenders from one line from touching the ascenders of the next line. Therefore you will measure in smaller point sizes as you are manipulating just that space. Generally a 2-4pt size increase in the vertical leading space is sufficient. If you decrease the font size the line spacing will not decrease. If you increase the font size, the line spacing will increase but keep the extra leading space.
Fixed line spacing is not flexible like the others. If you set a Fixed 14pt line spacing, then, regardless of the size of the font used, the line spacing is always set at 14pt. If you decided, for whatever reason, to make one word in the paragraph larger, like 24pts, you would find that a 24pt font can't fit into a Fixed 14pt line spacing. What would happen is that the top part of the 24pt word would be cut off.
Paragraph Spacing

The Nonprinting Character button displays the paragraph symbol every every time the ENTER key is hit.
![]() One bad habit of word processing that has been passed down over the years is the concept of hitting the ENTER key twice when creating a new paragraph. The common practice is to hit the ENTER key once to create a new blank line and then hit the ENTER key a second time to create another blank that starts the new paragraph. What users don't realize is that to a word processor program every ENTER represents a new paragraph. So when hitting this key to create blank lines, you are in fact creating blank paragraphs, not blank lines. You can prove this fact by turning on the "Nonprinting Characters" button on the Standard toolbar which displays the paragraph marks on the page.
One bad habit of word processing that has been passed down over the years is the concept of hitting the ENTER key twice when creating a new paragraph. The common practice is to hit the ENTER key once to create a new blank line and then hit the ENTER key a second time to create another blank that starts the new paragraph. What users don't realize is that to a word processor program every ENTER represents a new paragraph. So when hitting this key to create blank lines, you are in fact creating blank paragraphs, not blank lines. You can prove this fact by turning on the "Nonprinting Characters" button on the Standard toolbar which displays the paragraph marks on the page.
Eventually one of these empty paragraph spaces will end up at the top of a page creating an awkward blank space at the top, resulting in the next paragraph starting below the top of the page. The solution is to hit the ENTER key only once for new paragraphs and build into the paragraph style extra ABOVE of BELOW space.
 There are two options for paragraph spacing:
- creating space ABOVE a paragraph
- creating space BELOW a paragraph
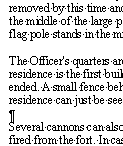
The top paragraph has 14pt BELOW spacing while the second paragraph needs and extra ENTER to create the same space between the paragraphs.
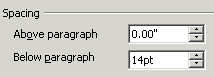
Generally the BELOW option is preferred. Once again Writer defines the measurement in inches but points is preferred. Typing a point size and adding the "pt" after the number allows Writer to use the point measurement while still converting it to inches. If you wish to have the same visual spacing that the empty paragraph space creates, then add 20% to the current font size. If using a 12pt font make the BELOW spacing 14pt. Once the BELOW spacing is set in Default paragraph style, it will no longer be necessary to hit the ENTER key twice to create a new paragraph.
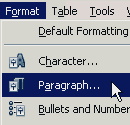 Keep in mind that once paragraph ABOVE/BELOW spacing is set in the Default Paragraph style, it is applied to all paragraphs and that includes bulleted and number lists. Each bullet/number list item is considered a separate paragraph, therefore each bullet/number list item will contain the same ABOVE/BELOW paragraph spacing as all the other paragraphs. This is one of those times you may need to do some manual formatting by selecting the bullet/number list items and manually remove or reduce the ABOVE/BELOW spacing. You can manually format individual paragraphs through the PARAGRAPH command found under the FORMAT menu on the Standard toolbar or through the right click context menu. You can also apply a List Style from the Styles panel to control the formatting of the bullet/number lists.
Heading Styles
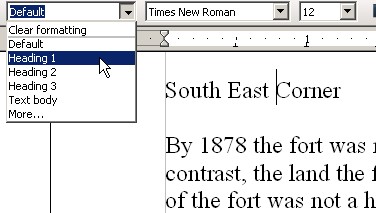 The Style Window drop down menu displays the first 3 hierarchal heading styles, opening the Style Panel will display 9 heading styles.
Most documents are made up of two basic styles; default paragraph style (the body of the document) and the default heading styles. It is important to identify headings by making them stand out. Headings serve two purposes:
- they make the document easier to read by breaking it into smaller pieces
- each heading advises the reader that a different topic is approaching
Making headings by manually selecting test and manually formatting it has two majors problems:
- its a huge waste of time to repeat the same multi formatting steps over and over
- there could be a lack of consistently in the formatting
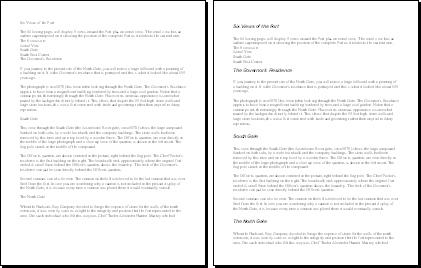 In this example comparing two identical pages with and without formatted headings it is clear that formatted headings visibly break up the document in smaller pieces, signaling quite clearly the change in topic under each heading.
If you create a document that contains 10 headings and you manually format each heading you will need to remember all the formatting options to be able to apply the same formatting consistently to all the document headings. There is no point in manually formatting headings as OpenOffice Writer already has pre-made heading styles ready to use. The easiest way to apply the heading styles is through the Style Window found on the Formatting Toolbar. The best part is that you don't need to highlight the text that is to be the heading, all you need to do is place the typing cursor anywhere in the text that is to be the heading and select the heading style from the Style drop down window.
Heading Structure
Its important to apply the proper heading style to the proper heading topic. The Style Windows shows 3 heading styles; Heading 1, Heading 2, and Heading 3. This is a very specific hierarchal structure and each heading level uses a smaller font indicating that it is a lower level category:
- Heading 1 is the top level heading - top level - largest font
- Heading 2 is a sub-heading under Heading 1 - secondary level - smaller font than Heading 1
- Heading 3 is a sub-heading under Heading 2 - tertiary level - smaller font than Heading 2
If you have trouble determining the heading hierarchal structure of you document here is an example of a simple hierarchal structure. Lets say you are writing an article on how to make a pizza from scratch. Here what your heading structure might look like:
Heading 1 - How to Make a Pizza from Scratch (title of the article)
Heading 2 - How to Make Great Pizza Doe
Heading 3- Thick Crust Pizza Doe
Heading 3- Thin Crust Pizza Doe
Heading 2 - How to Make Great Pizza Sauce
Heading 3- Pizza Sauce Made from Fresh Tomatoes
Heading 3- Pizza Sauce Made from Tomato Paste
Heading 3- Pizza Sauce Spices
Heading 2 - Layering the Ingredients on the Pizza
Heading 2 - Baking the Pizza
Heading 3- Baking Stone vs Baking Pan
Heading 3- Baking for the Proper Type of Crust
Heading 3- Broil for a Golden Topping
Summary
Global formatting of documents are quickly done with uniform and predictable results by modifying Writer's default paragraph style. Modifying the Default Paragraph Style allows a user to experiment with different formatting options without losing control of the document. Less time spent on formatting means more time to spend on content.
Keeping the heading formatting consistent throughout the document is important as it helps the reader determine the document structure through the different heading levels. Relying on Writer's Heading styles is the easiest and most reliable way to ensure consistent headings formatting throughout the document.
Comments or suggestions: lincpark@hotmail.com.