Topics
Constructing Shapes
Although there are many common shapes found in the Drawing toolbar, you may find that you would like something different. The easiest way to create a new shape is to use the Shape Commands to modify the common drawing shapes into a custom shape. This tutorial will focus on constructing custom shapes made from the variety of drawing shapes that can be found on the Drawing toolbar. You will be introduced to some very interesting and creative commands that can modify ordinary drawing shapes. This tutorial does assume some experience in using the Drawing toolbar to create drawing shapes. For those new to the Drawing toolbar and drawing shapes, the basic Drawing Shapes heading will provide a quick overview of the toolbar and the method of drawing and colouring shapes.
Topics covered in this tutorial:
- Shaping Tools
- Picture Shapes
- Text Shapes
- Converting Fontwork to a Curve
- Using Shapes to Crop Pictures
- The Slide Show and Shape Picture Problems
Shaping Tools
There are four basic shaping commands used to construct shapes and their names clearly state their actions.
- Combine - combines selected shapes into one shape with overlapping parts being either transparent or solid. There is a solid/transparent stacking order to the overlapping shapes.
- Merge - merges all shapes into the bottom shape.
- Subtract - top shape disappears after it punches out the bottom shape.
- Intersect - only the overlapping part is kept.

At least two shapes are required. As noted in this illustration the bottom shape is the key shape. All shape commands are applied to that shape.
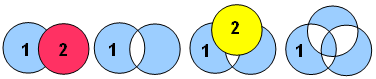 The Combine command requires a bit more comprehension in its operation. There is a transparent/solid overlap relationship in the stacking order of the shapes. It may be simpler to think of it as an Even/Odd relationship. Two shapes make an even number so their overlap is transparent. Add a third shape and where the third shape just overlaps the original two shapes, the overlap areas become transparent because there are only two areas overlapping at that point. But where the third shape overlaps the original overlapped part, it becomes solid because at that point there are three shape areas overlapping. Odd numbers of overlapped areas produce solid areas, even numbers of overlapped areas produce transparent areas.
![]()
The Drawing Tools
The shape commands are easy to master and will generally produce faster results than using the drawing tools to draw a custom shape. Although the drawing tools allow you to draw any kind of free-form line or free-form shape they do require some practise and patients to get the desired result. In contrast the shape commands are fairly straight forward and work on the pre-existing drawing shapes meaning very little experience is required to understand the shaping process.
As a bonus the custom shape retains its text box so text can still be typed in the custom shape. However, text in a custom shape will need to be handled a little differently than text in a basic drawing shape.
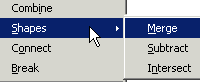 In Impress the Shape commands can only be accessed through the right click context menu. In Draw it can also be found under the Modify menu. There are no buttons on the toolbars for these commands so it will always be necessary to select all the objects and right click for the context menu. The Shape commands won't work on Grouped objects.
Constructing a Shape
The best way to demonstrate how to construct a shape is to actually construct one. In this example a "key" shape will be constructed. Key shapes are often used in slide shows to represent such concepts as "Key to Success" and "Unlocking Your Potential". Many generic key clip art images can be found on clip art CDs and on the Internet but creating your own key shape allows you complete control over the design and colouring making it uniquely your own creation.
Create the Pieces
No drawing skill is required when constructing a shape. All that is necessary is to create the individual pieces and all those pieces are found under the Basic Drawing Shapes category.
 To make the key shape only two types of drawing shapes are required: rounded rectangles and circle shapes:
- Two circles create the head of the key, with the smaller circle being used to punch a hole into the larger circle.
- A long rounded rectangle forms the stem of the key and 3 shorter rounded rectangles form the teeth of the key.
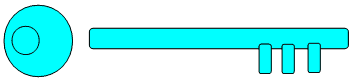 The next step is to overlap the pieces into their respective shapes.
- The small circle overlaps the larger circle and will be used to punch a hole into the larger circle.
- The teeth overlap the stem and will be merged into the stem
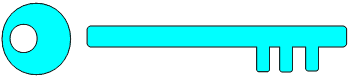 The Subtract or Combine command can be used to punch a hole in the key head. The Merge command is used to merge the three teeth into the stem. At this point there two choices: overlap the stem to the head and use the Merge command to merge them into one object or overlap them but keep them as separate objects.
 If the stem is merged into the key head, then it becomes one object. When applying colour the whole shape takes the same colour. If the stem is left separate from the key head then both the stem and the key head can have their own colours. (Make sure to Group the two objects so they stay together). Adding a gradient metallic colours adds to the key design.

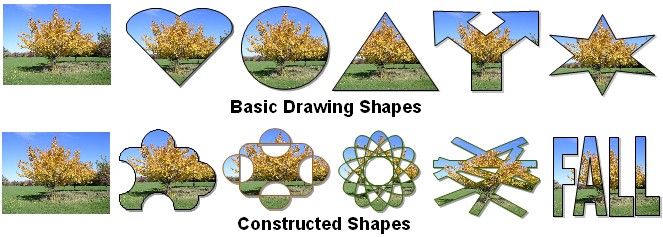
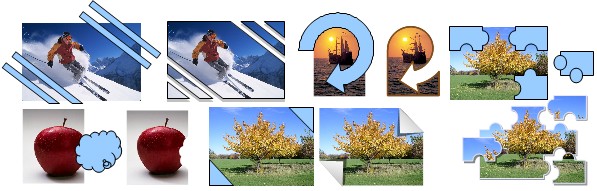
Some examples of constructed shapes. Multiple ellipse are rotated over each other, a Combine command creates a psychedelic effect when a gradient fill is added and the Merge command creates a flower shape.
Four circles are placed over a rounded rectangle and a combination of Subtract and Merge commands creates a "puzzle piece". Separately, the Combine and Subtract commands creates interesting geometric shapes.
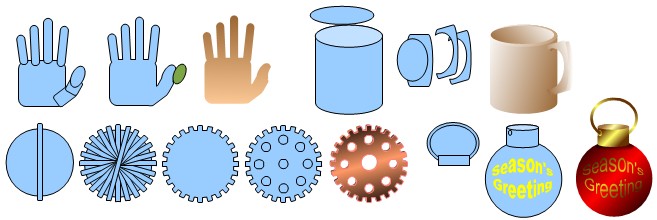
Using just the basic Drawing Shapes in conjunction with the Shape Commands to merge and punch out new shapes creates an incredible variety of objects, no drawing skills required. Adding a gradients fill rather than flat colour gives the objects dimension and therefore adds more realism.
Drawing/Constructed Shape Text Properties
Drawing Shapes
The Drawing Shapes and Constructed Shape have built-in text boxes, but they have different properties. Neither one, by default wraps the text within the shape. (If you always want to word wrap the text in a shape you can set that option in the default Graphic Style). There are two ways to access a shape's text properties:
- Right click on the shape and from the Context menu choose TEXT.
- From the Format menu: FORMAT-> TEXT.
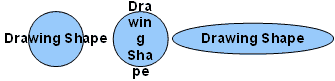 The Drawing Shape text, by default, does not word wrap within the shape . Text is always centred in the shape and expanded outward horizontally from the centre, left and right, in one continuous line. To word wrap text you need to access the Text properties. There are two options:
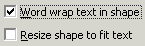 Word Wrap Text in Shape - if the text is too large or there is too much, the text expands off the shape
- Resize Shape to Fit Text - the shape expands to encompass the text.
Other Text shape properties include:
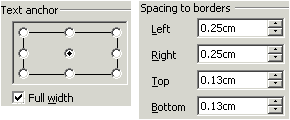 The Text Anchor - where the text is placed in the shape, the default is centred in the shape but there are 8 Anchor points (i.e. top left, top right, bottom left, bottom right). The Full Width checkbox only works with the three centre Anchors; top centre, middle centre, bottom centre.
Spacing to Borders - adjusts the internal margin spacing of the shape. Increase the spacing and the text is pushed away from the edges of the shape. Decrease the spacing and the text moves closer to the edge.
Constructed Shape
 Because Constructed Shapes generally have unique shapes their properties are different. There are only two options:
- Fit to Frame - stretches/compresses the text to fit the shape. If too much text is used it can make the test unreadable. When this option is checked the Border Spacing becomes available.
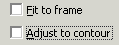 Adjust to Contour - fits the text within the shape's unique contour's and edges.
Unlike Writer, Impress (and Draw) does not support text wrapping at all. You can't wrap a paragraph of text around a picture like you can in Writer. But you can simulate the same effect using the Adjust to Contour option. All that is required is to punch out a hole in the Constructed Shape the same size as the picture and the text will flow within the contours of the shape and simulate the wrapping of text around a picture.
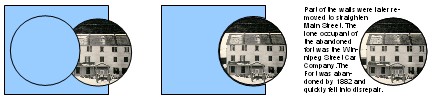 1) Draw a rectangular shape the size of the text it is to hold. Place the picture on top of the rectangle and position it how you would like the text to wrap around it.
2) Draw a shape the same size as the picture and place it over the picture.
3) Select the shape and the rectangle and use the Subtract Command to have the shape punch a hole in the rectangle.
4) Type and format the text in the rectangle. For a better fit turn on the Hyphenation. Remove the rectangle's fill and outline and the text will appear to wrap around the picture.
Pictures Shapes
In the Drawing Shapes lesson you learned how to import a picture to use as a bitmap fill for a drawing shape. Filling a shape with a picture can also be achieved by applying a Shape command to a drawing shapes that overlaps a picture. There are several advantages to this method:
- The picture doesn't need to be saved to the Bitmap list to be used as the fill.
- You can visualize the effect before you create it, something that can't be done when just using an image as a Bitmap fill.
- You can place the shape over any area in the picture and use just that area.
- There is less distortion of the image because you can crop and size the image if needed, to keep the same height/width ratio as the shape.
A picture shape can take on the shape of any of the pre-made drawing shapes or custom made construction shapes. To create a shape picture:
- Use the same portions if you don't want the picture distorted, the drawing shape and picture should have the same height/width ratio (resizing and/or cropping the picture is required).
- The drawing shape MUST be on top of the picture.
- The Intersect shape command will yield the best results.
 There's no magic as to how this method works, it is technically similar to using a picture as a Bitmap fill. As a matter of fact if you select a shape picture you will notice that in the Line & Filling toolbar, the picture is shown as a Bitmap fill. Therefore when you create a shape picture the picture is saved as a Bitmap fill and applied to the drawing shape. One difference between this method and importing a picture to be used as a bitmap fill is that the picture doesn't actually get added to the Bitmap list. You only see it as Bitmap fill when the shape picture is selected.
One of the main advantages to creating shape pictures rather than importing pictures to be used as bitmap fills is the fact that you have full control over both the drawing shape and the picture. This method will create less distortion of the original image because you can control the image size and proportions before creating the shape picture. After creating the shape picture all the methods of positioning and sizing an image in the shape still apply. However it is less likely that you will need to resort to these methods because you will be able to see clearly what the result will be prior to creating the shape picture.
![]() The default scaling method method used for sizing a picture within a shape is the AutoFit option. This means that the whole image is forced to fit into the drawing shape. Normally the AutoFit would distort the picture to fit the shape, but you will see how to avoid that pitfall. Also AutoFit means that there is no tiling of the image and the image fill will scale with the shape.
The default scaling method method used for sizing a picture within a shape is the AutoFit option. This means that the whole image is forced to fit into the drawing shape. Normally the AutoFit would distort the picture to fit the shape, but you will see how to avoid that pitfall. Also AutoFit means that there is no tiling of the image and the image fill will scale with the shape.
Setting Up the Picture Shape
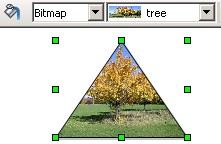
To minimize distortion of the picture, scale the drawing shape and picture to the exact same size (assuming, of course, that you wish to use the whole picture inside the shape). Unlike applying a Bitmap fill to a shape where you are forced to use the image at the size it was originally created, an image used for a picture shape can be scaled to the exact size need. The image can even be cropped if necessary. Plus you get to choose the exact area of the picture to use. Only 5 easy steps are required:
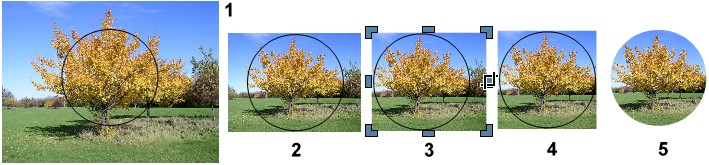
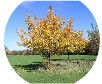
- Create a drawing shape and remove the fill but keep the outline. Scale the drawing shape to the size need and place it over the picture. You will now be able to capture a specific area in the picture because you can see what the drawing shape covers. Typically the picture will be larger than the drawing shape. In this example the centre tree is the desired area. Any area of the picture can be used, just place the shape over that area.
 Scale the picture area that will appear in the shape. If the top/bottom of the picture is made smaller than the shape, the image may appear to be cut off flat at the top/bottom of the image (remember that AutoFit scaling is used so there is no tiling). In the example to the right the picture top/bottom is made smaller than the drawing shape's top/bottom and appears to be cut of at the top and bottom.
 - Crop out the areas outside the shape. In this example, the picture is wider than the shape and therefore needs to be cropped. If you don't crop out the extended areas, the image will be compressed into the shape which will result in some distortion. The cropped picture should touch all sides of the shape (or as close as possible). In this example, if you didn't crop out the edges some distortion would be visible in the tree but it may not be an issue. However, if the picture used was someone's portrait any compressing of the picture into the shape would be noticeable.
- The height and width of the cropped picture now matches exactly that of the drawing shape. There will be almost no distortion of the image. The cropped out parts of the picture are not included in the final shape picture, therefore no compression or distortion happens because there are no extra parts of the image to squeeze in. This means you can control exactly which area of the image you wish to use, irregardless of the picture size.
- The Intersect Command is used to create the shape picture. No other Shape command will yield this result. The shape picture can be scaled and the image fill will scale with the shape.

Any area of a picture can be used, just place the Drawing Shape over that area. Scaling the picture larger or smaller and cropping out the unwanted areas, allows you to capture zoomed in or zoomed out areas wherever desired. This is why it is importance to use a picture that is larger than the Drawing Shape to help give you that flexibility. Keep in mind that a larger picture can always be reduced in size without loosing quality, but a small picture looses its quality (becomes blurry) if it is enlarged too much.
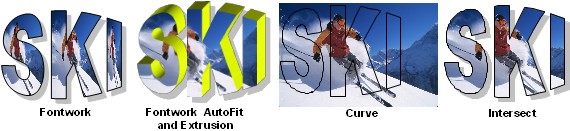
Text Shapes
The same technique that creates a picture shape is also used to create a Text Shape. However, instead of a Drawing Shape actual text letters are used as the shape. A few samples are shown below.

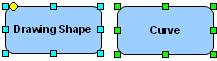 A Text Shape is regular text that has been converted into a special object that Impress refers to as a Curve. A Curve is a vector object, meaning that it is an object that is made up of scaleable lines. All the Drawing Shapes are essentially Curves, but with built in properties. If a Drawing Shape is converted to a Curve it will look the same but loose its built in properties as shown here with the rectangles. The rectangle on the left is a Rounded Rectangle (Drawing Shape) with a built in property for adjusting the roundness of the corners (yellow diamond). The rectangle on the right is a copy of the Rounded Rectangle but converted to a curve. They both look the same but the Curve rectangle does not retain the property to round out the corners. Also notice the difference in the colour of the handles. All the Drawing Shapes have Cyan coloured handles, while all non Drawing Shapes (including pictures) have green handles. There is also a major difference in the way they handle text as described above.
Convert the Text to a Curve
 Converting a text box into a Curve is a simple one step process. Once the text is converted, the Curves objects will look the same as the text letters but not retain any text properties at all. It is advisable to make a duplicate of the text in case of a spelling mistake or the need for a different font as the Text Shape can not be edited as text. Also the wider the font the easier it is to see the image in the letter shapes. Serif fonts like Times New Roman don't work very well as they have thin stems. Sans-serif fonts like Arial Black and Impact work very well because they have very thick letter stems. To convert a text box to a Curve:
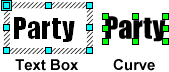 Select the text box border, not the text.
- Right click over the text box and from the Context menu choose To Curve (To Polygon and To Contour will also work in this instance but they have their differences so it's best to stick to the To Curve command).
- The Curve shape handles turn green and the text box is gone.
Although Impress refers to the object as a Curve its probably easier to think of it as a "Text Shape" (a Curve is common technical name for a Vector object that has no built in properties). The Text Shape is actually made up of individual shapes that look like text letters. These individual shapes are automatically Grouped together as one object. If you Ungroup them (from the Context menu: Ungroup) each letter shape can be modified as an individual object. It is not necessary to Ungroup them in order to modify the Fill or Outline. However if you do Ungroup them there is a lot of creative potential in modifying the letter shapes separately.

![]() Another reason to Ungroup the letter shapes before adding the fill is to move them closer together so there is less space between each shape. As a general rule, text letters are not evenly spaced. Each letter has its own Font metrics which is its built in letter spacing. Some text letters will have more and some will have less space between them and the next letter. Some letters when placed together like "AW" will appear to have too much space between them. Generally you want the letters as close together, but still readable. This will help to make the image more visible inside the Text Shapes. Spacing can be done one of two ways, while the letters are still text (Kerning) or after they have been converted to letter shapes (Curves):
Another reason to Ungroup the letter shapes before adding the fill is to move them closer together so there is less space between each shape. As a general rule, text letters are not evenly spaced. Each letter has its own Font metrics which is its built in letter spacing. Some text letters will have more and some will have less space between them and the next letter. Some letters when placed together like "AW" will appear to have too much space between them. Generally you want the letters as close together, but still readable. This will help to make the image more visible inside the Text Shapes. Spacing can be done one of two ways, while the letters are still text (Kerning) or after they have been converted to letter shapes (Curves):
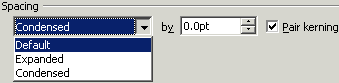 To adjust the text Kerning use the Character Menu: MODIFY-> CHARACTER-> POSITION-> SPACING-> CONDENSED. Spin up the Spin Dial but start with small increments, the Preview Window shows the result. You can try it with the PAIR KERNING checked or unchecked. Unchecked will force the letters closer together. You can also type an increment number rather than spinning up. Spinning up is at 1pt increments and but you can type any number such as 1.2 for very tiny incremental spacing.
- The best control for the spacing is after the text has been converted to Curves. The letter shapes are automatically Grouped together so you have to either Ungroup them (don't forget to Group them again) or Enter the Group. The Enter Group command allows you modify the the letter shapes, i.e. move them, without having to actually Ungroup them. To Enter the Group, right click on the letter shapes and from the Context menu select Enter Group. Everything on the page will dim out except the grouped objects. Make the modifications and double click anywhere on the page to Exit the Group. Every letter shape can be spaced exactly were you want it. You need to have patience to do this kind of intricate work especially if converting multiple words with a lot of letter shapes to adjust.
![]()
![]() One more option for text that may be of benefit is Horizontal Scaling. Increasing the Scale Width of text horizontally stretches the text letters making them wider. Wider letters means more of the image can show through. You can still use the Kerning to decrease the letter spacing, so both options can be used. The same effect, of course, can be achieved after converting them to curves and horizontally stretching the Text Shape.
One more option for text that may be of benefit is Horizontal Scaling. Increasing the Scale Width of text horizontally stretches the text letters making them wider. Wider letters means more of the image can show through. You can still use the Kerning to decrease the letter spacing, so both options can be used. The same effect, of course, can be achieved after converting them to curves and horizontally stretching the Text Shape.
 You may find that the Text Shape needs an outline to make it more readable. Too thick of an outline will make the image in the Text Shape harder to see and may make it harder to read. Outlines don't always have to be black, experiment with different colours and for consistency consider using a colour that is already in the image.
Try a drop shadow too, but keep it shallow. Sometimes a drop shadow adds to the shape sometimes it make it harder too read. Consider using a light grey rather than black for the shadow. If placing the Picture Shape over an image consider making the drop shadow transparent. This will make the Picture Shape "float" above the image (a black transparent shadow at about 20-40% works best here because transparent shadows always show up much lighter in the Slide Show).
Converting Fontwork to a Curve
If you have used Impress for a while, you have no doubt discovered the Fontwork tool. You can extend Fontwork's functionality by applying some of the techniques listed above to the Fontwork object. Fontwork uses the same Area Fill box has all the other shapes so formatting it is the same. What you may not know is that a Fontwork object can also be converted to a Curve just like all other Drawing Shapes. Once the Fontwork has been modified to the desired shape converting to a Curve will keep the shape but loose the Fontwork properties.
 One big reason you may want to convert a Fontwork object to a Curve is to have it better control over what areas of the picture show through the letter shapes. Normally, to apply a Bitmap fill to a Fontwork object the image needs to be saved to the Bitmap list. Most users don't realize that when you use a Bitmap fill with a Fontwork object, the image is actually placed into each letter separately. What you end up with is a part of an image that is repeated in every letter. If you choose the AutoFit option it just squeezes the entire image into each letter separately, not across the whole word. The only way that the image will span across the whole word is if the Extrusion command is used to turn it into a 3D object and the AutoFit option selected for the fill. (If you do not wish the extrusion effect set the Extrusion Depth to "0" and it will appear flat). However the image is still squeezed into the Fontwork object and will distort to some degree. More importantly there is no control as to the placement of the image in the letters and most likely the important area of the image may not be visible through the letters as shown above. Also keep in mind that you can't add an outline to an object that has the Extrusion applied to it and generally an outline is needed to help make the letters more readable.
Converting a Fontwork object to a curve combines the best of both worlds; you get to bend and shape the Fontwork text and then converted it to a Curve which allows you to control the placement of the image in the letter shapes. Its a good idea when converting a Fontwork object to a Curve to simplify it to its basic properties:
- Create the Fontwork object and shape it. Make sure it is spelt correctly because once converted to a Curve it is no longer text. Its always a good idea to make a copy of anything you are experimenting with so that you have a back-up.
- Remove the drop shadow that is automatically applied. The drop shadow can be applied later to the Curve object.
- Remove the Fill but keep the Outline. This will help you see what area of the picture will show through the letter shapes. (Note: sometimes when the shape has an outline but no fill and its converted to a Curve, the picture is squeezed into the thin outline rather than the shape area. Should that happen, just use the Undo command and remove the outline and add a solid colour fill. That will fix the problem).
- Do not apply the extrusion effect to it. You can not convert an object to a Curve that has an an Extrusion effect.
- Right click on the Fontwork object and select To Curve from the Context menu.
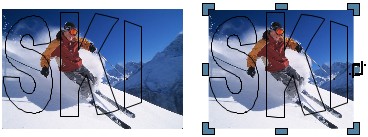 The Curve will look exactly like the Fontwork object. You can now place the Curve over the picture and see exactly what will show through the letter shapes. Scale the picture to the size that provides the best view of the area that will show through the letter shapes. Remember to Crop close to the letter shapes to minimize distortion. When everything is read, make sure to select both the picture and the Curve object and then choose Intersect from the Context menu. If you're not happy with the result, use the Undo command and shift things around and try again.
If you are big fan of the 3D Extrusion effect on a Fontwork object but still want an outline around the letters then duplicate the Fontwork object and remove the Extrusion from the duplicate and place the duplicate on top of the extruded Fontwork and just like that you have Fontwork object with an outline. To ensure they align properly use the Align commands from the context menu to align them both vertically and horizontally centred. Make sure to Group them.
Using Shapes to Crop Pictures
The Crop tool isn't the only tool that can be used to crop images. Any Drawing or Constructed shape can be used to crop in image into a interesting image shape. Sometimes you want an image to have a different shape so it appears more interesting. You may not wish to turn it into a complete picture shape, just something a little different. Below are some examples:
![]() Once again, a Bitmap Fill is technically created. No adjustment of the image fill is required as the shape only slices the image without distorting its Height/width ratio. The Intersect Command is used to slice the images.
Once again, a Bitmap Fill is technically created. No adjustment of the image fill is required as the shape only slices the image without distorting its Height/width ratio. The Intersect Command is used to slice the images.
The Slide Show and Shape Picture Problems
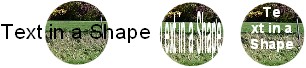
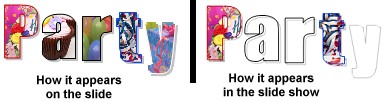 The Slide Show engine is the weakest component of Impress. If you have used Custom Animation, particularly on text, you know how choppy some of the animation can be. Unfortunately its not just the animation that suffers during the slide show, the graphics can take a hit in display performance. Everything discussed on this page will work fine during the slide show with the exception of Text Shapes that use an individual image for each letter shape. As the illustration above shows some of the image fills are missing in this Text Shape when played in the slide show. Fortunately the solution for this particular problem is fairly simple:
- Ungroup the Text Shape so all the letter shapes are independent. Do not re-group them!
- Remove all the drop shadows
Those two simple steps should clear up the problem and it should display as created. Animating this Text Shape will also requires an extra step:
- Select all the shape letters but DO NOT GROUP THEM.
- Choose an animation, it will be applied to all the letter shapes at the same time because they are all selected.
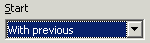 In the Animation Task Pane choose the WITH PREVIOUS command from the Start menu. This will ensure all the letter shapes animate together as one. You may wish to use just basic animation, nothing too fancy, just to be on the safe side.
It is good practise when creating complicated graphics to create one and then test it. In this case, check to make sure it shows up completely in the slide show. If it doesn't and you can't get it too work, then scrap it and move on too something simpler. As mentioned the Slide Show engine is fairly weak so you may encounter the odd problem with graphics here and there so its best to test one rather than waste time completing all the graphics just to find out they don't show up in the Slide Show. However you shouldn't let this stop you from experimenting with graphics in Impress. I've only encountered the odd customized graphic here and there that didn't work, but that's too be expected when moving beyond the defaults. After all it's in the experimenting where all the fun happens.
Conclusion
Constructed Shapes allows you to create custom objects with no drawing skills required. Adding images as a fill, especially with text shapes provides powerful say and show content, where the text actually displays what it is saying. A picture is "always worth a thousand words" and the Constructed Shapes are another way of integrating pictures into the slide.
Creating your custom shapes is often faster than trying to find that specific piece of clip art. Beside most clip art is very generic, so whenever possible why use something generic when you can create something unique.
Comments or suggestions: lincpark@hotmail.com.