Topics
Selection Tools
Pixels
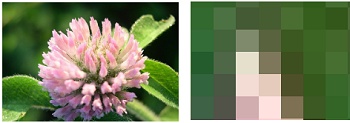 All raster images are made up of "Pixels". Each pixel contains a single colour and are very small. You don't see the pixels in an image in GIMP unless you increase the zoom well over 100%. The example on the right shows the original image and a highly zoomed-in portion of the image displaying some of the image's pixels. An image can contain millions of pixels. A digital camera that can take a 10MB picture will have resolution size of 3664 x 2748 pixels or 10,068,672 pixels in total.
Creating a selection around a specific part of an image will allow you to modify just those pixels in that part of the image. In the following three examples, selections were used to modify parts of an image while leaving the unselected parts untouched:

- Image 1:
Displays a cityscape at night. Because it is a low light shot, the camera picks up the brightness of the sky at the expense of darkening the foreground. The sky is perfect but the foreground is too dark. The right side of the image is the original image. In the left side of the image all of the foreground (buildings, trees and part of the river) were selected thereby isolating their pixels from the rest of the image. The selected area was then lightened to bring out the detail without affecting the sky. Therefore the section tools were used to isolate only the foreground part of the image thereby leaving sky unaffected by any changes. - Image 2:
To indicate speed, a Motion Blur effect is applied to the background without affecting the foreground player. To accomplish this the foreground player needed to be completely selected, isolating those pixels from the rest of the image. However, because the Motion Blur needs to be applied to the background, the section is then reversed, meaning the background is now selected. The Blur effect is then applied to the background without effecting the foreground player. - Image 3:
Demonstrates a simple way to do a colour test on a wall before actually buying any paint. In this example the colour green is being tested on the wall. As before a selection was needed to isolate part of the image, in this case the left wall was selected, but accurate selections were necessary to select around the outside of certain objects in the picture such as the picture frame, the couch edge and the table items. Zooming in close allowed for very tight selections around these contours. Colour was then applied to the selection without effecting the rest of the image. Many different colours can be applied this way to help determine a colour for a wall. (It should be noted that the colour was actually applied to a blank transparent layer that was placed over the image, thereby not affecting the image directly. Layers and selections go hand in hand. layers are discussed under the Layers button.)
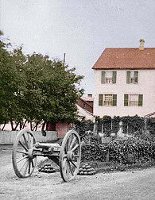 Another common example for the use of sections is to aid in colourize Black & White images. In this example of an old historic photograph, the tress, sky and building have been colourized. Colourizing black & white images requires creating very tight selections around elements in the image. Zooming in very close is essential to creating these tight selections.
Keep in mind that colourizing old black & white images also requires a far bit of planning to determine what colours should be used. You don't want to apply the colour styles of today to a bygone era. Sometimes a little historic research is required. When in doubt, earth tone, neutral colours or toned down colours work the best.
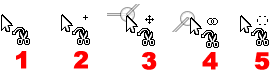
The Selection Tools
![]() The Selection Tools consist of 7 tools that create selections on an image differently. The tools are divided into two types:
The Selection Tools consist of 7 tools that create selections on an image differently. The tools are divided into two types:
- 5 Area selection tools:
- 2 Colour selection tools:
- Fuzzy Select Tool (more commonly referred to as the Magic Wand Tool)
- Select by Color Tool
Once a selection has been made around an image, it can be either expanded in size (added to), or it can be reduced in size (subtracted from). Quite often a tight selection requires both; adding to in one area and partially removing a selection from another area. The Tools Option panel will be necessary for some options as the options vary depending on the tool used. Some options that can be accessed through Keyboard shortcuts:
- SHIFT key - adds to a selection
- CTRL key - removes from a selection
- ALT key - moves the selection
- SHIFT+CTRL+ A delete the selection
- CTRL+I reverses the selection
When an area is selected, a selection marquee is visible around the selected area. The selection marquee is commonly refereed to as the "marching ants" because it is made up of small dashed lines that move around the selection making the selected area obvious.
Rectangle/Ellipse Select Tools
The rectangle/ellipse selection tools work identical except that one creates a rectangle/square shaped selection while the other creates an ellipse\circle shaped selection.
Creating a Rectangle Selection
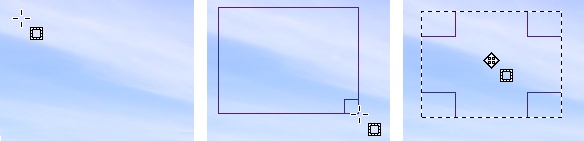
![]() As the name suggests the Rectangle Select Tools creates rectangular or square selections over an image. To select the tool click on its button or use the Keyboard shortcut "R". You draw out the rectangle/square selection by placing the Rectangle Selection Tool icon at the top left corner of where you wish to start (can be any corner) and drag over the area to cover as shown. When the tool is released the rectangular outline is replaced by a marquee often referred to as the "marching ants" selection because the little dash lines move around the marquee indicating that it is an active selection. Once drawn, the Target icon changes to the "Move" icon indicated by the four directional arrow. The Move icon allows the selection to be moved anywhere. If you click outside the marquee area the selection will disappear.
As the name suggests the Rectangle Select Tools creates rectangular or square selections over an image. To select the tool click on its button or use the Keyboard shortcut "R". You draw out the rectangle/square selection by placing the Rectangle Selection Tool icon at the top left corner of where you wish to start (can be any corner) and drag over the area to cover as shown. When the tool is released the rectangular outline is replaced by a marquee often referred to as the "marching ants" selection because the little dash lines move around the marquee indicating that it is an active selection. Once drawn, the Target icon changes to the "Move" icon indicated by the four directional arrow. The Move icon allows the selection to be moved anywhere. If you click outside the marquee area the selection will disappear.
While drawing the selection, if you hold down the SHIFT key the selection will be constrained to a "square". If you hold the ALT key while drawing the selection it will draw from the centre outwards. Holding down both the SHIFT and ALT keys at the same time will draw a square selection from the centre outwards.
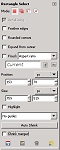
Resizing a Selection
 The selection marquee can be expanded or contracted through the corner areas indicated by small rectangles. Placing the icon over a corner changes the icon to the expand/reduce icon as shown. Dragging upwards or outward (diagonally) expands the selection and dragging down or inwards (diagonally) contracts the selection. The icon can also be placed in the middle as shown. If placed over the left/right middle rectangle area the selection is expanded/contracted horizontally only. If placed over the top/bottom rectangle area the selection is expanded/contracted vertically only. (Note only the left side of the rectangular selection is demonstrated but the same applies for all sides).
Creating an Ellipse/Circular Selection
![]()
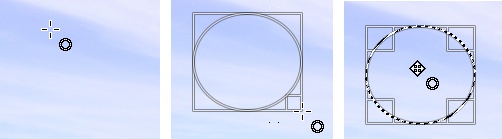 As the name suggests the Ellipse Select Tools creates elliptical or circular selections over an image. To select the tool click on its button or use the Keyboard shortcut "E". You draw out the elliptical/circular selection by placing the Ellipse Selection Tool icon at the top left corner of where you wish to start (can be any corner) and drag over the area to cover as shown. When the tool is released the elliptical/circular outline is replaced by the marquee. Once drawn, the Target icon changes to the "Move" icon indicated by the four directional arrow. The Move icon allows the selection to be moved anywhere. If you click outside the marquee area the selection will disappear.
While drawing the selection, if you hold down the SHIFT key the selection will be constrained to a "circle". If you hold the ALT key while drawing the selection it will draw from the centre outwards. Holding down both the SHIFT and ALT keys at the same time will draw a circular selection from the centre outwards.
Resizing the selection follows the same steps as resizing a Rectangle selection discussed above.
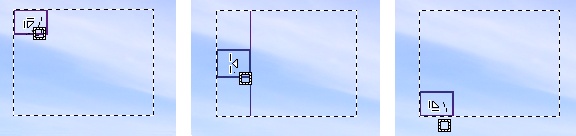
Adding/Subtraction Selection Areas
Once a selection is draw, another selection can be added or subtracted from the original selection. To add to a selection hold down the SHIFT key and a small "+" will be visible next to the selection drawing icon indication that the next selection drawn will be added to the current selection. To subtract part of a selection hold down the CTRL key and a "-" icon will added to the selection tool icon.
When the new selection is drawn, whether it's adding to or subtraction from the original selection, it will temporarily be the active selection and can resized or moved. When you are finished adding/removing click into the new selection or press the ENTER key to create the new adjusted selection. The marquis outline indicates the new adjusted selection. The steps for adding to a selection are shown below:

![]() The steps for subtraction part of an active selection are the same except that you hold down the CTRL key which creates the "-" icon on the selection tool. As long as the original selection is still active, you can continually add to or subtract from the original selection. If the adjusted selection needs to be moved hold down the ALT key and drag it to another location. The selection tool Options panel can also be used to add/subtract from a selection.
The steps for subtraction part of an active selection are the same except that you hold down the CTRL key which creates the "-" icon on the selection tool. As long as the original selection is still active, you can continually add to or subtract from the original selection. If the adjusted selection needs to be moved hold down the ALT key and drag it to another location. The selection tool Options panel can also be used to add/subtract from a selection.
Selection Tool Option Panel
 All the selection tools have their own unique panel options. In the case of the rectangle/ellipse selection tools they have almost identical options. To prevent getting bogged down in detail only the most common options will be discussed.
![]() The Mode buttons allow you to add/subtract from selections the same as the SHIFT and CTRl keys.
The Mode buttons allow you to add/subtract from selections the same as the SHIFT and CTRl keys.
 Feathered Edges soften the edges of a selection. When "checked" the Radius amount box becomes available and the radius can be spun up or down or dragged.
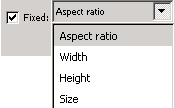 The Fixed options allows you to control the size/shape of the rectangle/ellipse selections. There are four options:
Aspect ratio: will constrain a rectangle to a square or ellipse to a circle.
Width: will allow you to dial the exact width of the selection but allow the height to expand as you drag.
Height: will allow you to dial the exact height of the selection but allow the width to expand as you drag.
Size: will allow you to type the exact height and width of the selection in the size box.
![]() Highlight: if the Highlight box is checked, the image will darken except for the selection area. This will allow you to see exactly what is selected.
Highlight: if the Highlight box is checked, the image will darken except for the selection area. This will allow you to see exactly what is selected.
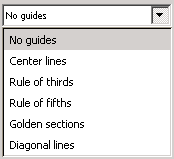
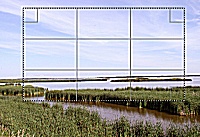 Guides: creates a compositional grid in the selection area. For example most photographers will follow a composition rule when taking pictures. The most common rule is the "'Rule of Thirds" which divides the scene to be photographed into a grid of three horizontal and three vertical lines. Many digital cameras will have this type of compositional feature built in so that you can lay a grid over the view screen to compose the picture.
If you need to crop a picture smaller the Guides can be very beneficial to help maintain that compositional balance prior to cropping the picture. In this example, the selection is using the Rule of Thirds guides.
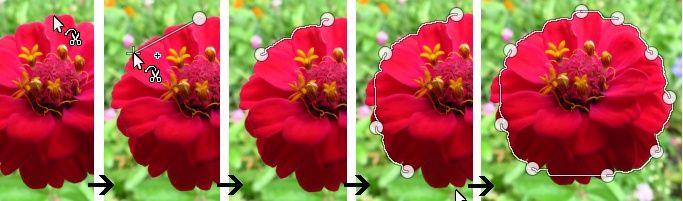
Free Select Tool
![]() The Free Select Tool allows you to draw a selection in any shape. Its icon looks like a "lasso". It is often use to create irregular shaped selections such a creating a selection around a flower. It will be one the most common selection tools used as rarely do you just select rectangular/elliptical areas in an image (other than to crop). It functions in two modes: Straight Line mode or Free Drawing mode.
The Free Select Tool allows you to draw a selection in any shape. Its icon looks like a "lasso". It is often use to create irregular shaped selections such a creating a selection around a flower. It will be one the most common selection tools used as rarely do you just select rectangular/elliptical areas in an image (other than to crop). It functions in two modes: Straight Line mode or Free Drawing mode.
 Straight Line mode
The Straight Line mode is used when selecting areas that contain fairly straight edges like buildings as shown here. It uses a "point and click" method meaning you click to set a control point (indicated by a yellow circle) and move the mouse in the direction of the edge and the straight line follows the mouse direction. To change directions you click to set another control point and the straight line will follow the mouse in any direction. You keep up this "point and click"method until the whole area is selected and then click back over the first circle to finish the selection. The straight line segments will then turn into the selection marquee. You can also just double click to at any time to turn the segments into the marquee.
How it Works
The basic click and drag method is demonstrated below:

1) Click to create a starting control point (represented by a yellow circle) and release the mouse button.
2)
Move the mouse downward along the edge of the building and the line follows the mouse movement downward (make sure you don't keep the mouse button down or you will go into the Free Drawing mode).
3)
To change directions click to set another point indicated by the yellow circle.
4)
Continue in this method until you return to the first point.
5)
Click back on the first point and the line segments will turn into the selection marquee (or hit the ENTER key to complete the selection at any time.
Free Drawing Mode
With the 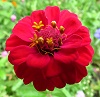 Free Drawing mode instead of clicking to create line segments, you keep the mouse button down and draw the line to trace the edges of the area. It's easier to understand this method if you think of it as tracing an edge with a pencil. As long as you keep the mouse button down the line will free flow with the movement of the mouse. If you don't keep the mouse button down it will go back into the Straight Line mode. This method is used for selecting around irregular shaped areas like the flower shown here. Although drawing the selection with a mouse is not very accurate, you can still use the "+" and "-" keys to add or subtract selected areas once the selection marquee has been created.
How it Works

1) Click, but keep the mouse button down, to start drawing the line. A yellow circle will appear indicating the first control point.
2) Keep the mouse button down and trace along the edges of the shape.
3) Click back on the first point to convert the line into the selection marquee (or hit the ENTER key to complete the selection at any time) .
There are times that you may need to use both the Straight Line mode and Free Drawing mode when drawing a selection. Keeping the mouse button down draws in Free Drawing mode while releasing the mouse uses the point and click Straight Line mode.
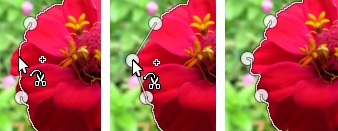
Editing the Selection
Because the mouse is not a very good drawing or tracing tool, tracing around the edges won't be perfect. You may get too much of the background or accidentally cut into the object being traced. This is not a problem as you can edit the selection marquee by adding to the selection or remove unwanted parts from the selection. The main idea is to complete the main selection as best you can and then edit the selection marquee afterwards. Shown below is an example of using the Subtract Mode in removing unwanted part of a selection marquee.

1) In the first image part of the background is accidental selected
2) With the Free Select tool still activated, holding down the CTRL key will produce the "-" above the lasso icon indicating that the tool is now in Subtract mode.
3) Click on the edge where the section has started to go out into the background. A Yellow Circle indicates the first control point.
4) Re-trace along the edges as shown in the fourth image.
5) Draw into the background as shown in the fifth image. It does not matter how much of the background is covered in the Subtract mode as long as it covers the unwanted selection area.
6) Return back to the original control point, which will be indicated by the Yellow Circle, and click to complete the selection.
7) The selection marquee is redrawn and the unwanted area has been removed from the selection marquee.
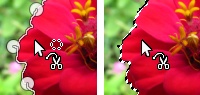
Adding or Subtracting from the selection marquee can be done over and over. If you accidentally hit the wrong key "+" or "-" when editing the selection and begin drawing just hit the ESC key to cancel that edit. As long as you don't connect the last point to the first point you can always cancel the edit with the Esc key. You can also use the Tool Option panel to add/subtract from the selection if you're not a fan of keyboard shortcuts.
Scissors Select Tool
![]() This tool is designed to automatically detect edges created by high contrast or differences in colour. You don't need to trace over the image like as with the Free Select tool. All you need to do is point and click at various point around the shape's edge for it to detect the edges. As the anchor points are laid down on the edges with the point and click method, the tool automatically draws the selection line around the edges that it detects. Once the selection marquee is created, if any editing of the selection marquee is required you will need to use the Free Select tool.
This tool is designed to automatically detect edges created by high contrast or differences in colour. You don't need to trace over the image like as with the Free Select tool. All you need to do is point and click at various point around the shape's edge for it to detect the edges. As the anchor points are laid down on the edges with the point and click method, the tool automatically draws the selection line around the edges that it detects. Once the selection marquee is created, if any editing of the selection marquee is required you will need to use the Free Select tool.
The advantage that this tool has for detecting edges is that as you click to drop the points it will automatically redraw the selection line around the edges so you can see what is being traced, and if it misses an edge, a control point can be repositioned to redraw that part of the line for a better edge detection. Therefore, you can edit the active selection line by adding or re-positioning the control points without having to convert it to a selection marquee.
 The Scissor Select Tool consists of five different icons as shown here:
- Icon 1 is the default icon that appears when the Scissor Select Tool is activated.
- Icon 2 appears after the first control point is created. It contains a small "+" indicating that new control points can be added, even over existing selection lines. Clicking with this icon on an existing selection line between two control points will add anther control point at that spot
- Icon 3 is the move icon and appears when the tool is placed over an existing control point. This allows the selected control point to be moved to another location which in turn re-traces the edges.
- Icon 4 appears when you click back on the first anchor point to complete the selection line.
- Icon 5 is the convert the selection line to a selection marquee. This icon appears when the selection line is complete. Clicking within the boundary area of the selection converts it into the selection marquee.
How it Works
To trace an edge using this tool is simply a matter of using a point and click method around the edges. The tool will try to discover the edges and trace them. Some tips for getting a good first trace:
- Keep the control points reasonably close together. The farther apart the control points are the less accurate it will be in determine the edges.
- Keep as close to the edges without accidentally click into the background.
- Zoom in to the area to be traced. The more clearly you can see the edges, the more accurately you can place the control points which yields a better edge trace.
- Its not necessary to do a perfect trace as you can move the control points afterwards for a tighter trace.
The basic point and click method is shown below. Remember that the trace doesn't have to be perfect as the control points can be moved around.
1) Click to set the first control point
2) Move the icon to the next spot. A straight line will connect the previous control point to the icon.
3) Click to set the next control point. In a few seconds the tool will try to determine where the edge is and convert the straight line into a flexible trace line.
4) Continue around the shape and click back to the first point to complete the selection line trace.
Editing the Active Selection Line
 As previously mentioned the trace doesn't have to be perfect because the active selection line can be edited. There are two options to edit:
- Move a control point
- Add control point
As shown here a control point is being added by placing the icon on the line that needs to be adjusted. The "+" indicator means clicking with this icon will create a new control point. Once the new control point has been created it can be dragged to an edge. Once again a straight line appears connecting the new control point to the previous points. In a few seconds the tool will try to determine the edges and convert the straight line into a flexible trace line. Sometimes all that is required is to just move a control point for a better trace. This process of adding/moving control points continues until the trace is satisfactory.
 Once the active selection line traces the edges satisfactory placing the icon within the boundary of the selection area produces the convert to marquee icon. Clicking with this icon creates the selection marquee. Any fine tuning to the edges can now be done with the Free Select tool and the "+" or "-" keys. It is not uncommon to use multiple selection tools to create tight selections.
Foreground Select Tool
![]() This tool works best when there is high contrast or strong colour differentiation between foreground and background. The Foreground Select tool does not require high accuracy in selecting areas. It is made up of two different tools:
This tool works best when there is high contrast or strong colour differentiation between foreground and background. The Foreground Select tool does not require high accuracy in selecting areas. It is made up of two different tools:
- Lasso tool: used to select an area (similar to the Free Select tool)
- Paintbrush tool: used to brush over selection to indicate the foreground colour
The lasso tool is used to draw around an area that you wish to select. You don't need to be accurate as long as the area you wish to select is completely covered by this tool. The paintbrush tool is used to paint a brushstroke over the foreground area so that the tool can differentiate the foreground colours from the background colours. Once it determines the difference between foreground and background colours a "mask" is placed over the foreground area to mark it (by default the mask is represented as a blue transparent area, but in the options in can be changed to red or green). Hitting the ENTER key converts the mask to a selection marquee.
How it Works
The step are shown below, in this example the red flower is meant to be the foreground area:

Step 1: The lasso tool is used to draw a selection line around the red flower with control points. This tool behaves the same as the Free Select tool so it can be used as point and click or free drawing. Some of the background needs to be included so it can different between foreground and background colours.
Step 2: Connecting back to the first control point completes the selection and automatically converts the selection area into a mask. The lasso tool automatically changes into the paintbrush tool.
Step 3: The paintbrush is used to paint a brushstroke over the red colour of the flower indicating that the red colour is the foreground colour. Its important not to paint over any of the background. A simple circular brushstroke as shown is adequate, its not necessary to try and paint out the whole flower. By default, the Toolbox's Foreground colour is the colour of the brush. The actual colour of the brushstroke is not important as it is only being used to indicate which colours represent the foreground colours.
Step 4: When the stroke is completed, releasing the mouse button produces the Foreground Extraction timer. Complicated edges will require more time for extraction.
Step 5: When the extraction timer is finished the extraction is complete and a darker blue mask is placed over the foreground object.
Step 6: Hitting the ENTER key converts the mask to the selection marquee.
Any editing of the selection marquee can be done with the Free Select tool. This tool's Option panel contains extra features such fine tuning the colour range and changing the mask colour.
Fuzzy Select Tool
![]() This tool is used to select a colour range in an image (in most programs it is referred to as the "Magic Wand" tool). This tool works by examining the RGB colour numbers of the pixels that it clicks on. It requires the use of some of the options available in its Option panel to maximize its performance, particularly the Threshold and Select By features.
This tool is used to select a colour range in an image (in most programs it is referred to as the "Magic Wand" tool). This tool works by examining the RGB colour numbers of the pixels that it clicks on. It requires the use of some of the options available in its Option panel to maximize its performance, particularly the Threshold and Select By features.
 For example, if you wanted to enhance the sky in the landscape image shown here you would need to select just the sky without selecting any of the trees. This is a situation where the ability to select colour is more important that selecting areas. However what you would find is that clicking in one area of the blue sky does not select all of the blue sky. There are two reasons for this:
- A typical blue sky in the image can contain hundreds of different shades of blue. At its default setting the Fuzzy Select tool only selects a small range of colours.
- At the default settings the pixels selected by the tool need to contiguous (connected together). In this image the white clouds partition the sky into areas that segregate the blue colour pixels and therefore they are not connected together.
There are three ways to select all of the shades of blue in the sky:
- Hold down the "+" key and click on different areas of the sky to add mores shades of blue to the selection
- Increase the Fuzzy Wand's Threshold so that it automatically selects a greater range of colours.
- Choose Blue from the Select By option to have the Fuzzy Select tool select all the blue colour in the sky.
All three methods will be discussed so the user gets an idea of how the Fuzzy Select tool selects colour ranges.
How it Works
Adding to the Selection:
By default the Threshold for the Fuzzy Select tool is set to "15" (the maximum is 255). This is a low threshold setting meaning that a small range of colours will be selected. Therefore one way to increase the range of colours is to add different colour areas to the selection:
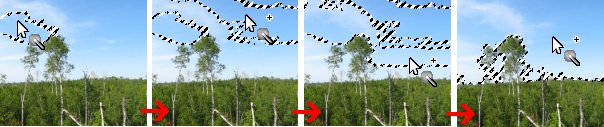
Step 1: The Fuzzy Wand tool is used to click on an area in the sky to create the first selection marquee.
Step 2: With the "+" key held down the tool is moved to another part of the sky to add that area to the selection marquee.
Step 3: The process continues to add until all the sky is added to the marquee section.
The more you zoom in, the better your section will be as you will be able to select the blue sky in between the branches without accidentally selecting the branches.
Increasing the Threshold:
![]() Increasing the threshold increases the range of colours to be selected.
Too high of a threshold and most of the colours in the image will be selected (the maximum value is 255). The Threshold box is found in the Fuzzy Select tool's option panel. To modify the value:
Increasing the threshold increases the range of colours to be selected.
Too high of a threshold and most of the colours in the image will be selected (the maximum value is 255). The Threshold box is found in the Fuzzy Select tool's option panel. To modify the value:
- Spin the gray buttons on the right of the box, top one increases the number, the bottom one decreases the number.
- Click on the number in the box and type another number or use the arrow keys on the keyboard to increase/decrease the number.
- Drag the blue slider (located on the left of the box) right to increase the number, left to decrease the number.
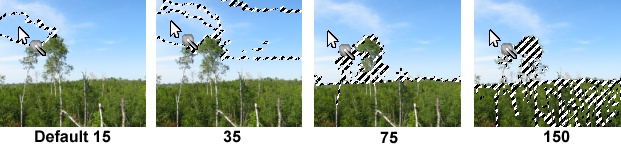
Each image represents just one click at the same spot but with a different Threshold range.
Its not uncommon to combine the actions of the "+" key and an increase in the Threshold value to add to the selection marquee. After some experience with this option you will be able to guess what a colour's threshold should be.
Select By Menu:
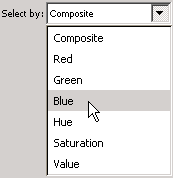 The Select By menu is an advanced method of selecting colours in the image. It works in conjunction with the Threshold box. It consists of seven options:
- Composite - the default setting
- Red - focuses on the colour red, regardless if its mixed in to create other colours.
- Green - focuses on the colour green, regardless if its mixed in to create other colours.
- Blue - focuses on the colour blue, regardless if its mixed in to create other colours.
- Hue - Focuses on a specific colour
- Saturation - focuses on the purity of colours
- Value - focuses on the light/dark values of colours
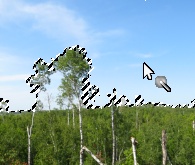 When you want to select all the blue in the sky, choosing Blue from the Select By menu is an obvious choice. In this image the Select By is set to Blue and even with the default Threshold of 15, most of the blue colour is still selected. The only area not selected is the sky area trapped between the trees, which would have to be added to the selection. You could undo the selection (CTRL+SHIFT+A) and increase the Threshold and click again (or just leave the selection and increase the Threshold and click again) or hold down the "+" key and click to add the area to the selection. Keep in mind that the trees also contain blue in them so increasing the threshold too much may select some of the trees also.
However choosing colour from the Select By menu doesn't always work the way you might expect. This is because the pixel colours in an image are made up of three primary colours, Red, Blue and Green and the many of the pixels in this image will contain all three of these colours in varying amounts.
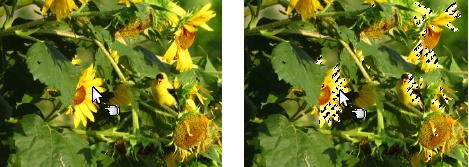
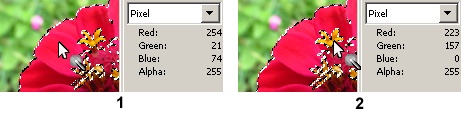 For example in Image 1 the Select By colour was set to Green, with the Threshold set at 50. As shown the Fuzzy Select tool clicks on the red of the flower and the most of the flower still gets selected, as indicated by the selection marquee, except for the yellow stamens. Next to the image is the Pointer panel that indicates the exact RGB colour of the pixel that the tool clicked on. Note the RGB colour numbers. In other words the pixel that was clicked on also contains a green value of 21 which is why the flower area is still selected. Since the Threshold is set to 50, the range of green numbers can expand both higher and lower to within that tolerance. Therefore even in the darker shadows of the flowers there is green and as long as that green number is within the tolerance it will be selected.
(However, this doesn't mean that hitting the DELETE key will only delete the green colour from the selection. If you hit the DELETE key the whole selection will be deleted and replaced with the Background colour that is set in the Toolbox).
Notice that in Image 2 the yellow stamens do not get selected, even thought they also contain green. This is because the Green number value is much higher than the pixel that was selected and the Threshold value of 50 limits the amount of green that can be selected to within a smaller range.
For most situations leaving the Select By set to its default of Composite is usually sufficient for most selection needs because you can always use "+" key to add to the selection marquee.
Select By Colour Tool
![]()
 The main difference between this tool and the Fuzzy Select tool is that the Select By Colour tool will select the same colour found in the whole image, regardless if the colour area is trapped by other colours. It has the same options as the Fuzzy Select tool.
In this example the default Threshold of 15 is used and the tool clicks on a yellow in one of the sunflowers. The same colour range of yellow is selected throughout the image. It is the equivalent of the menu command Select Similar that is found in other programs.
Comments or suggestions: lincpark@hotmail.com.