Topics
GIMP Environment
The GIMP program is designed to work with images such as enhancing and touching-up images, colorize Black & White images, create image montage, etc. It contains powerful image editing tools that can do the job very well. Although the program comes with many different tools tools to touch-up and enhance images, probably the three most important basic tools to focus on are:
- Selection tools and saving selections
- Layers and Merge modes
- Levels and Curves adjustments
Each tool will be discussed separately on the Topics menu on the left.
However, the first concept that a new user to GIMP will need to master is how the the GIMP window behaves. Because the GIMP program was not originally created as a MS Windows program it behaves a bit differently from a typical MS Windows program. Also note that in GIMP version 2.8 the GIMP Window has a new feature called "Single Window Mode" that behaves differently than the standard GIMP Window. Since the "Single Window Mode" is not turned on by default, GIMP 2.8 still behaves similar to the previous versions. Both the standard GIMP Window and "Single Window Mode" are included here.
The GIMP Environment
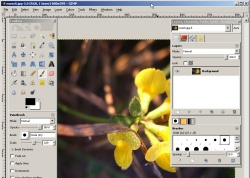
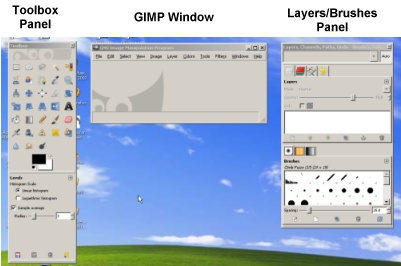 For MS Window users, the GIMP window isn't quite the same as your typical program window. When you start GIMP, the program places itself on top of other windows but does not necessarily completely cover them as is typical in most MS Window programs as show here on the right. Fortunately, in version 2.8, which is the latest version of GIMP (as of June 2012), the GIMP Window will displayed almost maximized. However, regardless of which version is used, the panels always float above the window.
When GIMP opens it displays three elements:
- A small floating GIMP Window
- A floating Toolbox Panel
- A floating Layers/Brushes panel.
Each element can be moved independently around the screen. This is different from a typical MS Windows program which opens as a single Window that contain all the elements within that window. In example above the Desktop is clearly visible behind the GIMP program.

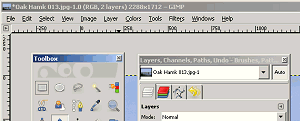
 If you wish to maintain everything within a single window then the simplest solution is to Maximize the GIMP Window. Once the GIMP Window is maximized it will mostly behave like a typical MS Windows program. The panels will be contained with the window but still float above the GIMP Window and can be moved around within that window. When an image is opened it will be displayed within the maximized window. However, because the panels are still separate elements to the window they will still float over the image and may need to be moved around to prevent them from obscuring the image.
In this example the Toolbox Panel is in "focus" therefore the "+" keyboard shortcut to Zoom-in will not work.
Window Focus
Because the GIMP Window and the two panels (Toolbox Panel and Layers/Brushes Panel) are still separate elements they all have a separate "focus", meaning that sometimes keyboard shortcuts don't always work on the GIMP Window unless you have it selected. For example the keyboard shortcut to Zoom-in on an image is to click the "+" key on the keyboard or the Number Pad. However, if you just selected a tool from the Toolbox Panel, this panel it will be in "focus" and not the GIMP Window and therefore the "+" key will not Zoom-in on the image as the "+" key Zoom-in shortcut only works when the GIMP Window is in "focus". Fortunately this quirk with the "focus" is relegated mostly to the GIMP Window Zoom features. You can always tell which element is in "focus" by its Title bar. Depending on your MS Windows colours, unfocused windows usually have gray Title bars.
Single Window Mode
Single Window Mode.
Note that the Toolbox and Layers Pallet are locked into the window and do not float.
The latest version of GIMP, version 2.8, adds a new feature called "Single Window Mode" (WINDOWS -> SINGLE WINDOWS MODE). When this option is activated all the panels become embedded into the GIMP Window, as shown here. In this mode the GIMP interface behaves more like a typical MS Windows program. In other words, the Toolbox and Layers/Brushes panels don't float over the GIMP window but are part of the Window and behave like typical panels (can be stretched wider or narrower, can be made to float, and can be closed and opened). Once this mode is activated any new panels added to the Window will be added as a "tab" to the Layers Panel. Panels can also be docked beside each other rather than grouped to together as tabs
This new feature also adds "Image Tabs" above the ruler. This means that multiple images can now be opened and displayed in the same Window, rather than being opened in separate Windows. Each opened image has its own Tab (three Image Tabs are shown in this example), that allows you to click on a Tab to select a different opened image within the same Window.
The Single Window Mode does require a higher resolution and/or a wide screen monitor to take advantage of the docked panels as they do take up considerable space on both sides of the Window, particularly if the panels are docked beside each other rather than as tabs within a panel.
One of the advantages of this mode is that the problems of window "focus" is mentioned above for the earlier versions is not a problem here.
The GIMP Window
The GIMP Window contains the Menu Bar; FILE, EDIT, etc. and it is the window that contains the image. To open an image:
- FILE -> OPEN
- Keyboard shortcut CTRL + O
The Open Image box is fairly large and consists of three panels;
- File directory panel (Places)
- Image select/details panel (Name, Modified)
- Image preview panel (Preview)
Once an image has been selected click the OPEN button to open the image into the GIMP Window. To open multiple images at once; SHIFT + Click for contiguous images or CTRL + Click of non-contiguous images.

 In version prior to 2.8, selecting an image would automatically show a Preview of the image in the Preview Window. However in version 2.8 you will need to click into the Preview Window to generate the image preview if the preview isn't displayed. If there are a lot images that don't have a previews, you can use the SHIFT or CTRL key to select the range of images that don't have previews and then click in the Preview window to automatically generate a preview for each of the slected images.
If the original image has been modified then you may see "Preview out of Date" in the Preview Window. This means that image preview hasn't updated to reflect the new changes made to the image and you are asked to click the preview to update it to match the the new image.
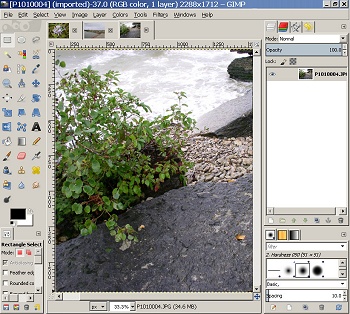
 As shown on the right, once an image is opened, both the Toolbox and Layers Panel always stay on top of the image (even in Single Window Mode a panel not docked to the side will float and can cover the image). It's always best to Maximize the GIMP Window to see as much of your image as possible as the panels will overlap it. If you have a wide-screen monitor or your monitor's resolution is set higher, the panels don't intrude over the images as much as they do when a monitor is set at lower resolution.
Keep in mind that in this three panel system; GIMP Window, Toolbox and Layers panels, that there is a shift in window focus when selecting either of these panels and that some keyboard shortcuts, like the Zoom In/Out keyboard shortcuts, only work if the GIMP Window is in focus (selected).
The Toolbox
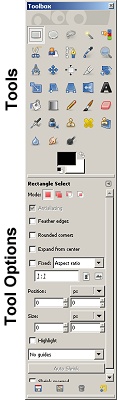 The Toolbox consists of two parts; the top panel contains all the GIMP tools and the bottom panel contains the options for a tool that has been selected. Therefore the bottom panels is always changing in reference to the the current tool selected.
Toolbox
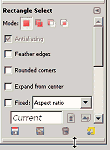
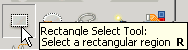 Hovering over a tool pops open a Tool tip that displays the tool's function and its Keyboard shortcut. For example to access the Rectangle Select tool through the Keyboard you press the letter "R". Unlike the GIMP Window, the Toolbox panel does not need to be in "focus" for the Keyboard shortcuts to work.
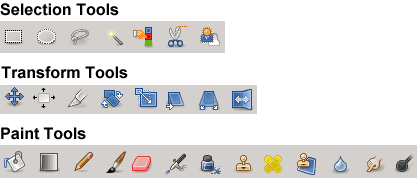 Although not obvious because there is no demarcation, most of the tools are organized into function types:
• Selection Tools
• Transform Tools
• Paint Tools
The Selection Tools select pixels or areas in an image to be modified.
The Transform Tools modify selections and/or layers.
The Paint Tools modify the pixels in an image by painting over them, transferring pixels from one area to another or giving the appearance of smudging, sharpening or blurring them in an image.
![]() The Black/White squares at the bottom of the Toolbox represents the Default Foreground/Background colours. Both colours can be changed to any colour by double clicking it's square to open the colour mixer. The small double arrows on the top right switches the Foreground/Background colours and the small black/white squares on the bottom left, resets the squares back to their default black & white colours.
The Black/White squares at the bottom of the Toolbox represents the Default Foreground/Background colours. Both colours can be changed to any colour by double clicking it's square to open the colour mixer. The small double arrows on the top right switches the Foreground/Background colours and the small black/white squares on the bottom left, resets the squares back to their default black & white colours.
![]() The Toolbox can also be stretched wider or narrower by stretching the edges with the Double Stretch Arrows. A wider Toolbox reduces it vertical height but makes the Toolbox wider. If using the Single Window Mode, the toolbox becomes embedded into the GIMP Window and can not be resized.
The Toolbox can also be stretched wider or narrower by stretching the edges with the Double Stretch Arrows. A wider Toolbox reduces it vertical height but makes the Toolbox wider. If using the Single Window Mode, the toolbox becomes embedded into the GIMP Window and can not be resized.
All the tools in the Toolbox can also be accessed through the TOOLS Menu in the GIMP Window.
Toolbox Options
 When a tool is selected its options become available in the Toolbox Options. All tools will have different options and some will have more than others. Its important to examine the options when selecting tools. Unlike the Toolbox, most of the individual options don't contain Tooltips that explain their use.
The Tool Option box can be made vertically smaller by dragging its bottom edge upward. When made smaller a Scrollbars appears which will require scrolling for all the options.
The Tool Options can also be separated from the Toolbox by dragging it away from the Toolbox. It can be docked with the Toolbox by dragging it back into the bottom of the Toolbox. The Tool Options box can also be "locked" to the Toolbox to prevent it from being accidentally dragged away.
The Layers/Brushes Panel
 The Layers/Brushes Panels are the default panels that open with GIMP.
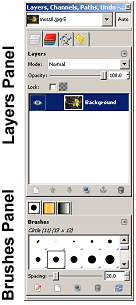
Layers Panel
![]() The Layers Panel group consists of four Tabs, each represented a different panel:
The Layers Panel group consists of four Tabs, each represented a different panel:
• Layers Tab - displays and modifies the image layers
• Channels Tab - displays the RGB (Red, Green, Blue) channels of the image
• Paths Tab - displays any drawn paths in the image
• History Tab - Undo/Redo steps
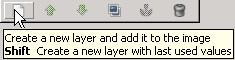 Each Tab in the panel has its own function buttons found at the bottom of the panel. Hovering over an Function button displays a Tooltip describing that function.
![]() The panels also contain an of an Arrow icon at the top right called "Configure This Tab". Clicking the Arrow opens a menu that consists of customizable configuration options, such as making your own Panel groups. It also contains a menu options for that specific tab, i.e., for the Layers Tab, the Layers menu option is also displayed by the Arrow, which is the same Layers menu found under the Menu bar.
The panels also contain an of an Arrow icon at the top right called "Configure This Tab". Clicking the Arrow opens a menu that consists of customizable configuration options, such as making your own Panel groups. It also contains a menu options for that specific tab, i.e., for the Layers Tab, the Layers menu option is also displayed by the Arrow, which is the same Layers menu found under the Menu bar.
Fortunately, the Panels also make extensive use of the Right Click Context Menu. The Context Menu displays more Functional options for that tab.
By default the the Layers Tab is the 1st tab because because it is the most useful tab. As previously mentioned tabs can be mixed and matched with other panels to create custom Panel groups.
Brushes Panel
![]() The Brushes panel consists of three tabs each representing a different panel:
The Brushes panel consists of three tabs each representing a different panel:
- Brushes Tab - contains the brush shapes used when working with the Pencil, Paintbrush or Airbrush tool, such as hard edge, soft fuzzy edge and Pattern brushes.
- Pattern Tab - seamless tile patterns that can be applied to selections and layers.
- Gradient Tab - gradient (blended) colours that be applied to selections and layers.
![]() Each Tab in the panel has its own function buttons and they are found at the bottom of the panel. Hovering over an Function button displays a Tooltip describing that function.
Each Tab in the panel has its own function buttons and they are found at the bottom of the panel. Hovering over an Function button displays a Tooltip describing that function.
![]() Like the Layer Panel tabs, there is an Arrow icon at the top called "Configure This tab". Clicking the Arrow opens a menu that consists of customizable configuration options, such as making your own Panel groups. It also contains a menu options for that specific tab, i.e., for the Brushes tab, the Brushes menu option is displayed by the Arrow.
Like the Layer Panel tabs, there is an Arrow icon at the top called "Configure This tab". Clicking the Arrow opens a menu that consists of customizable configuration options, such as making your own Panel groups. It also contains a menu options for that specific tab, i.e., for the Brushes tab, the Brushes menu option is displayed by the Arrow.
Additional Panels
There are still more panels available and all panels are found under the WINDOW Menu: WINDOW -> DOCKABLE DIALOGS. However, for the most part the default Panels will be the most useful Panels.
Saving/Exporting an Image
GIMP use its native file extension ".xcf" to save images that contain added properties like layers. Layers are not supported in common image formats like .jpg images. Therefore when adding layers to a .jpg image it will need to be saved as a GIMP .xcf file to preserve the layers. Otherwise you can save the .jpg or any other image file that GIMP supports in its original file format or it can be save it in a different image format.
When using the SAVE or SAVE AS command in GIMP 2.8, GIMP will automatically save an image in the ".xcf" format. This means that if you are working on a .jpg images and you want to keep it in the .jpg format you will need to Export it as .jpg image.
Now that you know how the basic GIMP Environment works its time to click on the links on the left to learn some of GIMP's main tools.
Comments or suggestions: lincpark@hotmail.com.